Volleyball Coach Free Documentation
Your Fantastic Theme / template documentation
Overview
- Name of Theme: Volleyball Coach
- Author : misbahwp
- Support Forum : https://wordpress.org/support/theme/volleyball-coach/
- License : GNU General Public License v3 or later
- An explanation :The Free Volleyball WordPress Theme is a versatile and cost-effective digital solution designed for individuals and organizations involved in the world of volleyball. Tailored to meet the needs of coaches, players, and enthusiasts, this theme provides an accessible entry point into the online realm, offering a visually appealing and functional platform without the burden of costs. The theme features a clean and modern design that reflects the energy and vibrancy associated with the sport of volleyball. Its user-friendly interface ensures easy navigation for visitors across various devices, from smartphones to desktops. The theme’s responsiveness is a key benefit, allowing volleyball enthusiasts to engage seamlessly with content regardless of the device they use. This free theme is designed for a broad audience, catering to individual coaches, volleyball teams, or enthusiasts looking to establish their online presence without the financial commitment of a premium theme. It is an excellent starting point for those who want to share their love for the sport, provide valuable resources, or build a community around volleyball.
How to Establish the Theme
Setup Theme
Template installation is very simple process.
WP Admin can also be used to install your theme.
Entering into your WordPress admin area is the first thing to do. After that, click on
1. Click Appearance>> Themes in the dashboard.

2. Click the Add New button at the top of the themes page once the page has loaded..

3. The "Upload Theme" button should be clicked.'.

4. Choose your volleyball-coach.zip theme by clicking the Browse button, then click the Install Now button.

5. WordPress will now install your theme, provide a success message, and provide a link for you to activate or view the live preview. Congratulations on finishing the theme installation.
Setup Home Page
This page template has controllable options that include section placement, section disabling, and the number of posts displayed.
Use these guidelines to create a home page.
1. Create a page with the template on it: Access the Dashboard Pages >> Add New Page

Call it "home" or whatever term pleases you. Choose "front page template" from the template dropdown menu after that.
Your page has a parent page and a template that are provided by the Page Attributes section.
1.Create a page with the template on it: Select Dashboard >> Pages >> Include a New Page

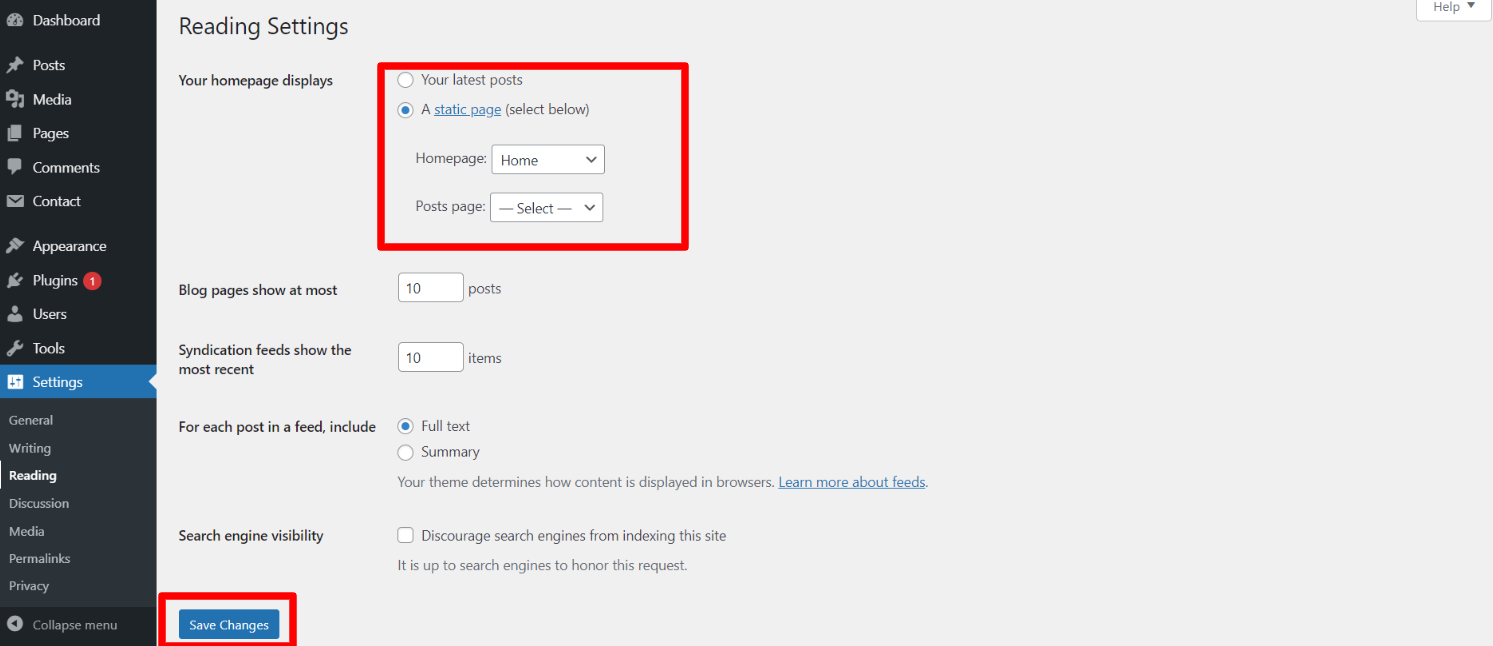
Design the front page as follows: Go to Setting >> Reading >> Set the front page display static page to home page.

When you're finished, you'll be able to see all of the demo content on the front page.
Necessary Plugins
On your Dashboard, you'll be prompted to install these plugins when you first activate the theme. If you decide later on that you do not want to install these plugins during theme activation, you can install them manually. Alternatively, you can choose to ignore the message.
Navigate to Plugins >> Install Plugins in the dashboard.
Kirki
Link to download the plugin kirki
WooCommerce
Link to download the plugin WooCommerce
Set Up Menu
Set Up Menu
Open the Dashboard and navigate to Appearance >> Menu
Go to the Dashboard and select the 'Appearance' menu from the left-hand menu to open the Menu Editor. Choose the 'Menus' option from there.
Use these procedures to create a new menu:At the top of the page, select "Create a new menu".Enter a name for your new menu in the "Menu Name" box.Click on the "Create Menu" button.
The creation of your new personalised menu has been completed.

To expand the things on your menu.
In the Menu Editor, locate the section labeled "Pages"
Select the checkbox next to the title of each page you wish to add.
Once you have selected the desired pages, click the "Add to Menu" button.
The customised menu has been successfully saved.

This is how the menu will look on the front end.

Volleyball Coach Free Theme Setup
Configure Header
To proceed with The steps below will allow you to set the header button and top header text.
On the dashboard, navigate to Appearance >> Customize >> Theme Options >> Header Settings
In front end, it will look like this.

Logo Setup
To move forward with Theme Logo setup, You have the option to set the site title and tagline, follow the below steps.
Go to Appearance >> Customise >> Site Identity >> on the dashboard. Establish a title and tagline. The tagline can also be hidden.

In front end, it will look like this.

Slider Section
Fetch Categories
This screen is divided into 2 sections, the Add New Category and category table sections.
All of the categories are listed in this table. Categories are organized alphabetically and hierarchically.
To move forward with Theme social icon, so follow the below steps.
Follow the below steps to setup Category Settings.
On the dashboard, navigate to Posts >> Categories >> Add New

Once you have done with this you will see the categories on your theme customize.
In this section, you have to add new category for each post.
Fetch Post
On the dashboard, navigate to Posts >> Add New

To continue with Post Settings, you must first set the post title and content. and choose the category in which you want this post to appear.
Follow the below steps to setup Post Settings.
On the dashboard, navigate to Posts >> Add New
You can make multiple posts for category.

Once you have done with this you will see the post on your front page.
Slider Settings
To move forward with Theme Slider Settings , You have the option to set the slide show , follow the below steps.
On the dashboard, navigate to Appearance >> Customize >> Theme Options >> Slider Settings
Choose how many slides to display, then choose the category that needs to be displayed on the slider.

In front end, it will look like this.

Sales Text Settings
To move forward with Sales Text setup, You have the option to set the text and button text and button url follow the below steps.
On the dashboard, navigate to Appearance >> Customize >> Theme Options >> Sales Text Settings You can also make the tagline hidden.

In front end, it will look like this.

Featured Product Section Settings
Featured Product Section Settings
Fetch Categories
Important Step: Install WooCommerce plugin in your wordpress.
In the Dashboard, go to Products >> Categories >> Add New

This screen is divided into 2 sections, the Add New Category and category table sections.
All of the categories are listed in this table. Categories are organized alphabetically and hierarchically.
Follow the instructions given below to setup Category Settings.
Once you have done with this you will see the categories on your theme customize.

In this section, you have to add new category for each product.
Fetch Products
In the Dashboard, go to Products >> Add New

TProceeding with the Product Settings, Product title, description, price, and image can all be customised. Additionally, decide which category you wish to see this product in.
Follow the instructions given below to setup product settings.
In the Dashboard, go to Products >> Add New
You can make multiple category.

To move forward with Daily Delights Section follow the instructions given below.
In the Dashboard, go to Appearance >> Customize >> Theme Options >> Featured Product Section Settings
You can heading and sub heading for section. You can choose from this options for each products settings.
You can select number of tabs to show in section. You can select text of tab. You can select category to display product choose from this options for each settings.

In front end, it will look like this.

Setup Footer Section
The footer consists of four columns. You can add any widget there...
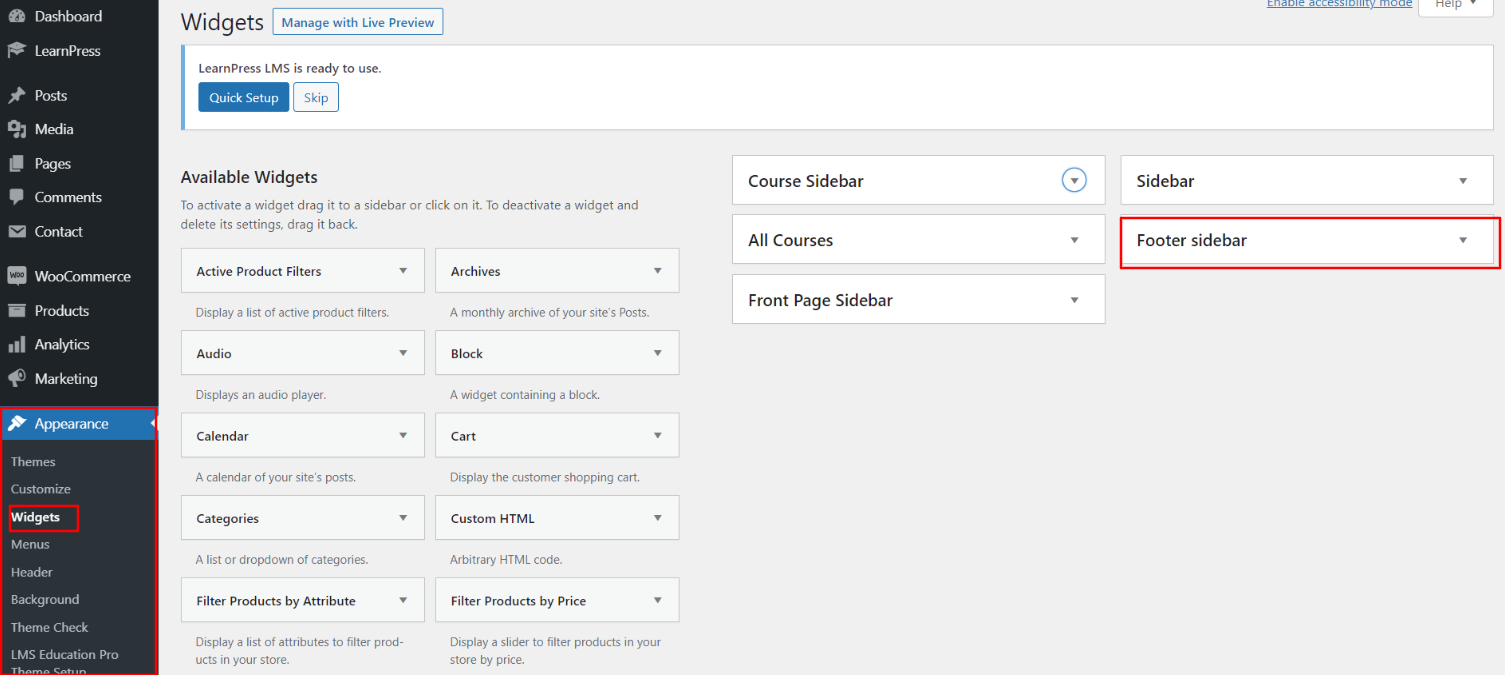
1. On the dashboard, navigate to Appearance >> Widgets
To add widgets to the footer, see the screenshot below.

You can add footer columns by choosing widgets such as text, image, gallery, etc. that make it simple for you to add text or images of your choice..
Navigate to and take the actions listed below to manage the content for the footer and add some widgets.
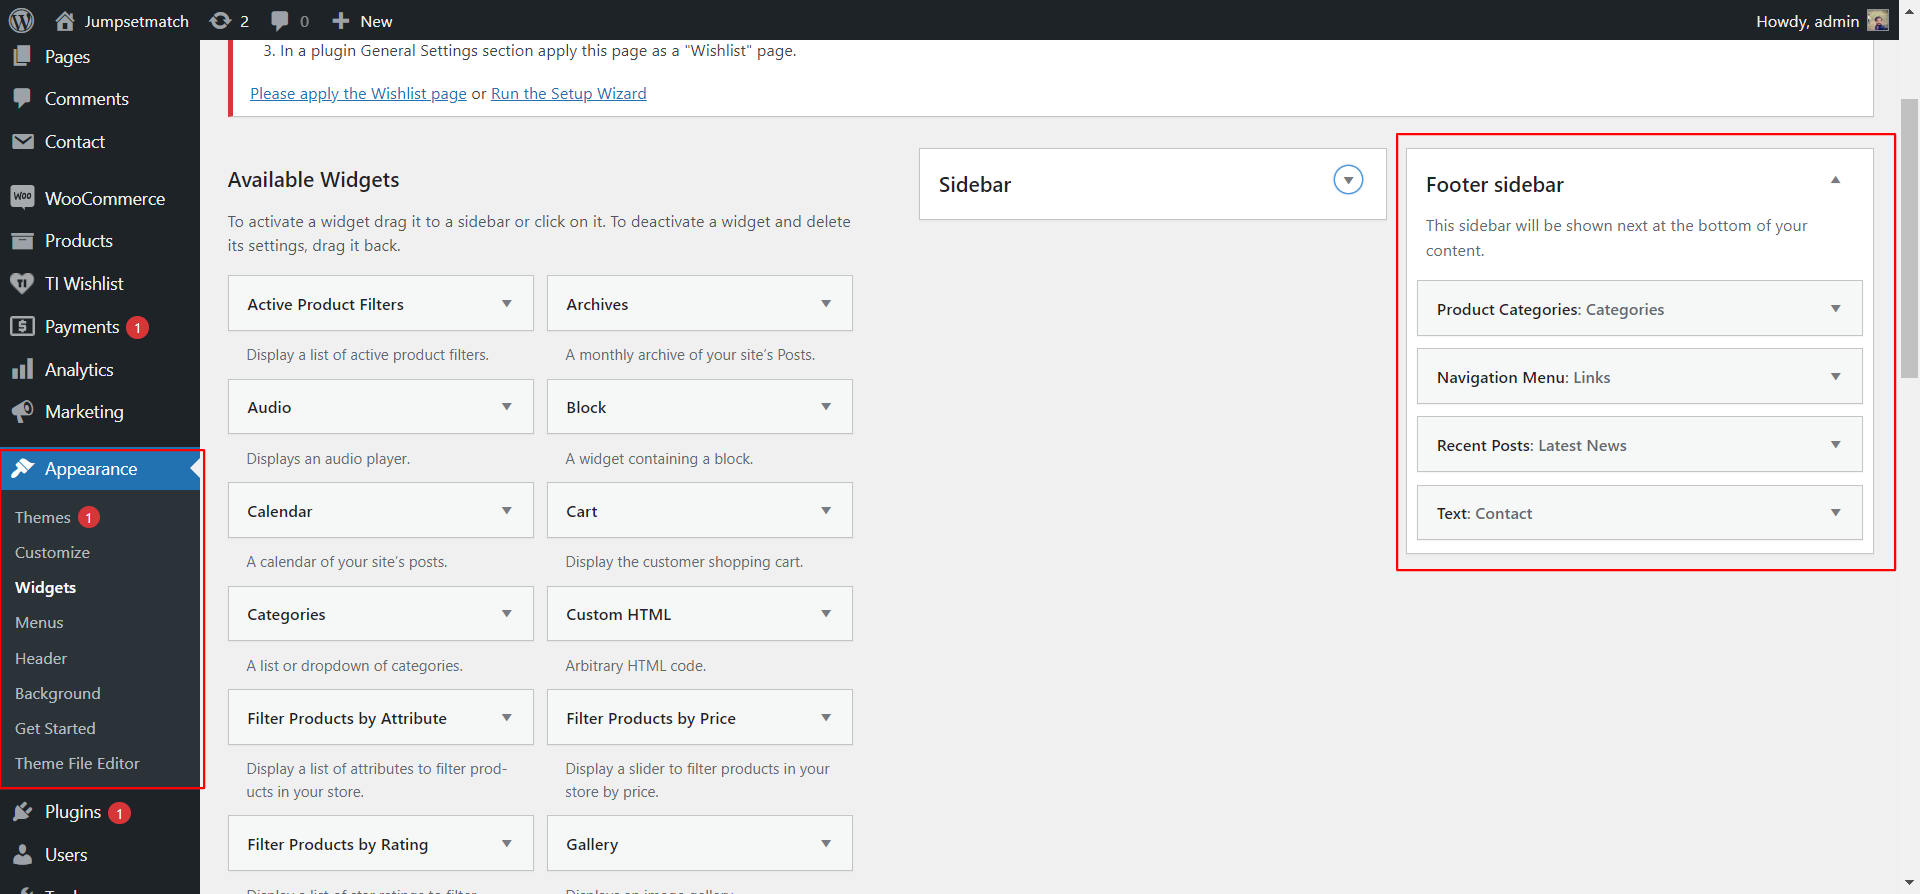
2. On the dashboard, navigate to Appearance >> Widgets >> Footer Sidebar

After you add widgets to it, your footer will look like this.

Copyright Text in the Footer
To move forward with footer Settings, You can fill the copyright content to footer copyright Settings.
5. On the dashboard, navigate to Appearance >> Customize >> Theme Options >> Footer Copyright Setting

In front end, it will look like this.
